How To Digi-Scrap for Free (or very nearly): Part 2 - Establishing a Digital Workflow
Establishing a Digital Workflow
In Part 1 of this mini-series, I covered which free software you'd need to get started with digital scrapbooking, and mentioned several of my favorite sites for good quality free digi-scrap supplies and affordable printing.
In this entry, I will cover my digital workflow for working with photos - that is, how I get my pictures from my camera onto my computer and do first pass editing.
My next post will cover my workflow for digital scrapbooking assets (paper, embellishments, etc), and finally I'll walk through creating a simple scrapbook page in Gimp.
We'll cover the following
1. Copying (Importing) photos from your camera onto your PC
2. Filing photos under date based folders for easy recall
3. Performing a first pass in Picasa to "star" good photos and delete un-salvageable ones
4. Performing a second pass in Picasa to fix color, exposure, and red eye on best photos
5. Save edited photos
For this tutorial you will need Picasa installed, as well as your camera with either the cable it came with, or a USB card reader. A card reader is a handy little device with a slot for your camera card. You can get them for anywhere from $8 to $30 from your electronics store or online. You put the card in the reader and plug the reader into the PC and your system treats it as another hard-drive. This is my preferred method.
In many cases, your PC or laptop will also have a built in card reader, which eliminates the need for an extra device.
Workflow Step 1: Copy Photos onto your PC
1. Plug your camera into your computer, or insert your camera memory card into your card reader. In a moment or two, depending on which version of Windows you are running, you will probably get a pop-up message asking you what you'd like to do next. It may offer you the option to view the pictures in Windows Media or Picasa, copy them using some other piece of pre-installed software, or etc.
Don't choose any of these: choose the option to open a folder to view the files. (Near the bottom)
A new window will open up displaying the folders on your camera card.
In my case, there is a root folder called "DCIM," and then there are numbered subfolders inside like "616CANON," "617CANON," etc.
Your camera will almost certainly be slightly different, but the general idea is the same.
2. Open a new file explorer window and create a new folder in the appropriate location on your hard drive to store your photos.
I use a date-based naming scheme for storing my photos, because it is easy, objective, and quick to scan afterwards. When the pictures from a given day are from a specific location or event, I often tack on a word or two to jog my memory as well.
So on my computer you'll find a folder structure something like this:
My Pictures201101-05-2011-kidsathome01-20-2011-Grace2MonthPortraits01-22-2011-BlogPhotos
etc.
(One more thing to note: Windows sorts folders in Alphabetical, not Numerical order. So if you want to make sure that January always appears ahead of December, make sure you put a zero in front of the one for all January folders!)
3. Select all the photos from your camera card, and drag them into the new folder.
Simple as that: your photos are copied to your computer!
At this point, you can delete the photos from your camera, or you can wait until you actually run out of space on the card if you like the security of one more back up.
If you need a little more detail on copying photos from your camera to your computer, there's a good description of the process here - scroll to the bottom for the article.
Workflow Step 2: Review and Edit in Picasa
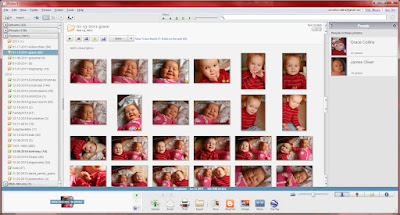
1. If Picasa is not already open, open it now. Once it starts, you'll probably see a small pop-up window on the lower right of your screen showing its progress of scanning and indexing your new photos. You will also see a large number of thumbnails of your photos. This is called the "library" view.
2. Using the "Folder" view on the left hand side of Picasa's window, navigate to the folder containing the photos you just copied.
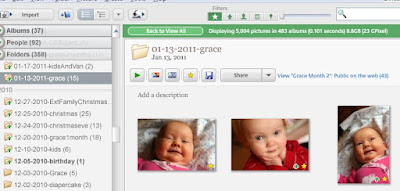
You will notice that Picasa organizes all folders by date - that is, the date they were created, not necessarily the date included in the folder's name. It also displays a "flat" file structure - that is, it shows only folders that contain photos, and it does not visually display folders that are "inside" of other folders. If you've spent a lot of time inside of windows and have a good feel for the underlying file system you may find this confusing or restrictive; otherwise it should probably feel very natural to you!
3. Review your photos by double clicking on the photo's thumbnail, then navigating through each image using the arrow keys.
During this first pass I delete any obviously unsalvageable photos - those badly out of focus, significantly over or under exposed, or containing sensitive family members with goofy looks on their faces. ;) Don't go too crazy, though: you may be surprised how well Picasa can solve under-exposure, red-eye, and even (mild) blurriness, not to mention color balance problems, cropping issues, and etc.
On the first pass I also typically use the "star" function to mark my best photos for later review and use, especially when I shot 100+ photos of a single event!
On the better photos I also frequently use the "I'm Feeling Lucky" button (left panel in Picasa) to see if the program can do a quick-and-dirty fix to make my good photo even better. Often it can. Other times I am not happy with its automatic color and contrast correction and decide to use finer-grained controls (either in Picasa or Gimp) later.
4. Perform a second pass on your starred photos
These are the photos that I think I may use in a scrapbook page, print for the grandparents, or etc.
Near the top center of Picasa's window, you will see a "Filters" label. The first button is a star. When you click it, only starred photos are displayed.
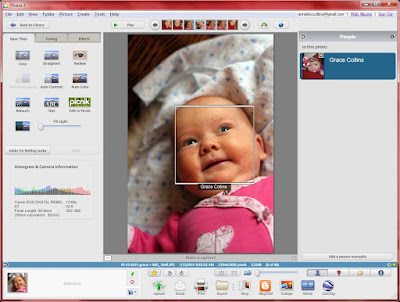
During this pass I fix red-eye, fine-tune contrast and color balance, and occasionally even crop or use one of the artistic effects. All these functions are accessible on one of the three tabs that display when you are viewing a photo full sized (as opposed to a thumbnail in the library.)
If you intend to make use of Picasa's "People" or "Tags" capabilities, this would be the time to do it.
I have never gotten in the habit of using either feature heavily, and sometimes I regret it.
The Tags and People panels are turned on and off using buttons on the lower left of Picasa's window, in both library and single photo view. "Tags" allows you to assign key-words to your photos. Logical options would be place names, event names, etc. Later you can easily search for tags inside of Picasa.
Similarly, "People" allows you to identify individuals in your photos. Picasa does a reasonable job of picking out faces automatically, and even does a decent job of matching names to faces once you have a good catalog. This can be handy later on when you need a photo of Grandma and can't remember when you last visited her!
5. Save your changes.
Picasa maintains all changes you've made only internally by default. They are never stored to your hard drive until you explicitly tell it to do so. So if you need to use the photo elsewhere - perhaps you want to print it at Costco, or use it inside a scrapbook page - you need to save it.
You can do this in a couple of ways.
(a) select the photo or photos you want to save and hit Cntrl-S, or File-Save.
(b) At the top of your folder in "Library" view, click the "disk" button next to the star icon.
In either case Picasa will ask you to confirm your decision, and will also reassure you that it is making a backup of the originals.
(This is critical, BTW: the first law of digital photo editing is "Never Overwrite the Original!" Picasa saves those originals in a hidden folder inside the folder where you copied the photos. You'll need to set Windows to display hidden files if you need to find them someday.)
A couple of notes
Picasa and Gimp have a lot of overlap. Deciding to use one vs. the other is a question of "good" vs. "good enough," with "time" and "ease" on the other side of the equation.
For instance, I use Picasa to fix red eye because it's quick and easy, and doing the same task in Gimp is complicated.
I sometimes use the "I'm feeling lucky" button, but I also use Gimp's color balance controls instead of or on top of this. They're harder to use, but offer more control.
I rarely use Picasa's "Sharpen" effect because Gimp's "Unsharp Mask" is both easy to use and significantly better.
Depending on your experience and comfort with the two programs you may choose differently.


Comments