Digi-Scrap for Free: Part 3 - Organizing your Supplies
In this, rather shorter, entry I will cover how I use Picasa to (sort of) organize my Digi-Scrap supplies.
Overview
1. Unzip files to a central folder under "My Pictures"
Inside Picasa
2. Force all Scrap supplies to appear together by changing folder dates
3. Add keywords in the folder description for easier searching
4. Use Picasa's search filters to locate files you want, then open then in Gimp
Disclaimer: my methods are kludgy at best. (Kludgy is geek-speak for "inelegant," "inefficient," or just "messy"). Picasa is not really designed to handle these sorts of pictures, so I have to force the square peg into a round hole as it were.
I haven't found a better solution, let alone one that is free and easy, so I live with Picasa and continue to find it "good enough."
Back in Part 1 I mentioned a number of my favorite resources for downloading free, high quality scrapping supplies, and also mentioned a few tips on how to make sure you're getting quality items.
Here's what I do once I've downloaded my stuff:
1. Unzip into a central location
Most versions of Windows have some sort of built-in archive extractor. I use Windows 7, and I don't remember if there either isn't one or I just didn't like it, 'cause I downloaded Pea Zip and use it for all my zipping and unzipping needs.
I created a folder called "ScrapbookLayouts" under "My Pictures." Call yours whatever you like - maybe "ScrapSupplies" would make more sense, for instance.
I unzip everything into sub-folders under this location. I name the sub-folder based on the name of the downloaded file - nothing more complicated than that. (9 times in 10 the publisher put her elements into folders and subfolders inside the archive, so you often end up with deep folder structures, but this isn't that big a deal.)
2. Edit Folder Details in Picasa
Here's where it gets kludgy. Picasa is very strongly date-based. Your folders appear in its system based on the date that folder was created - not the date you downloaded it, unzipped it, or whatever. That means your new supplies could be hiding mixed among your photographs anywhere between 2005 and 2011. Ugh!
I want all my digi-scrap supplies to appear together, and this is my hack:
(a) Find your new supplies in Picasa's file system. If necessary, use the search function (I'll cover it later!) to find your new supplies - just type the name of the folder.
(b) Change the date of the folder to a year Before you have any photos on your computer. For instance, I don't have any pictures older than 2006 on my hard drive, so I change all my scrap supplies folders to 2005.
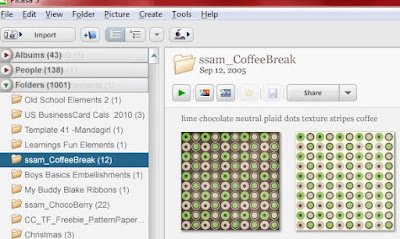
In the screenshot above, notice were it says "Sep 12, 2005" under the folder name ("ssam_CoffeeBreak"). Just double-click the date to open a pop-up window allowing you to change all of the folder's details.
(c) While editing the date, add some keywords too!
Again referencing the above screenshot, notice where it says "lime chocolate neutral plaid" etc.
I try to put a bunch of useful keywords in the folder description box - colors, shapes, types of elements, etc. - so I can search for one of these terms later and find my supplies.
If you're experienced in Picasa or similar programs you may notice that I am NOT using the built in "tag" function, which would seem to make a lot more sense. Here's my rationale: it takes a lot more time and clicks to add tags to an image or folder then it does to type a bunch of keywords in the folder description, and it is no easier to search by tag than by keyword. So why bother?
That's literally all I do as far as organization! It's quick and dirty, but it's "good enough."
Finally, let's learn how to use those keywords you just created.
3. Finding Files In Picasa and the underlying File System
Searching in Picasa is a simple as putting a keyword of phrase in the "Find" bar at the top right.
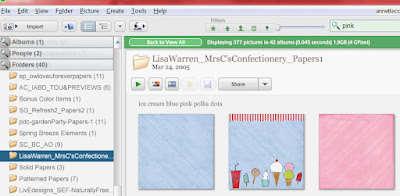
In the screenshot above you'll see I've entered the term "pink." Your folders are now filtered to show only the ones where the word "Pink" appears in the name, description, or tags. In this case, "pink" appears in the folder description I entered for this folder.
Once I have found the paper or other image I want to use on my page, all that remains is to find it on the file system so I can open it in Gimp.
(a) select your image, then hit "Control-Enter" to open a new *Windows* file explorer window to the folder that contains it.
(b) In the Windows File Explorer, copy the entire path of your folder (in Windows 7, when you click inside the File Explorer "address bar," the contents collapse into a standard path like "c:\users\my name\my pictures\scrapbooklayouts\prettyPinkPaper")
(c) Inside of Gimp, use Control-O to open a new file, and paste the path you just copied in the pop-up window. Then select the file you want.
(Much more on what to do next in the upcoming entry!)
At this point I need to mention one last limitation of using Picasa to manage your digi-scrap supplies. Picasa only works on JPG, GIF, and BMP files - maybe a couple more as well, but the point is it does NOT display PNGs. Most of your downloaded scrapbooking *embellishments* are going to be PNGs or another fancier file type. So don't worry when all you can find inside Picasa are the background papers. The embellishments are not missing, they simply cannot be previewed.
Thankfully, most publishers also provide a preview / contact sheet in JPG format showing every paper and embellishment on a single page. Those Will appear in Picasa and I use them to jog my memory and to create keywords.
In summation, there is almost certainly a better method out there to organize your digi-scrap supplies. Picasa is good enough for me because it doesn't require me to use yet another program, invest a lot of time and effort into tagging each individual item, or (worst of all) buy something!


Comments