Sewing with Little Girls: Felt Mermaids
My husband and I have weird dates. Our favorite thing to do after dumping the kids with their grandparents is head for a downtown area that has plenty of Pokestops, have dinner somewhere, and then walk for about an hour catching imaginary monsters visible only on our phones. If we're really lucky, we take down a couple of gyms and hatch an egg or two. Either way, we are secure in the knowledge that not only are we are seriously uncool, but we're also getting a lot of exercise and enjoying one another's company.
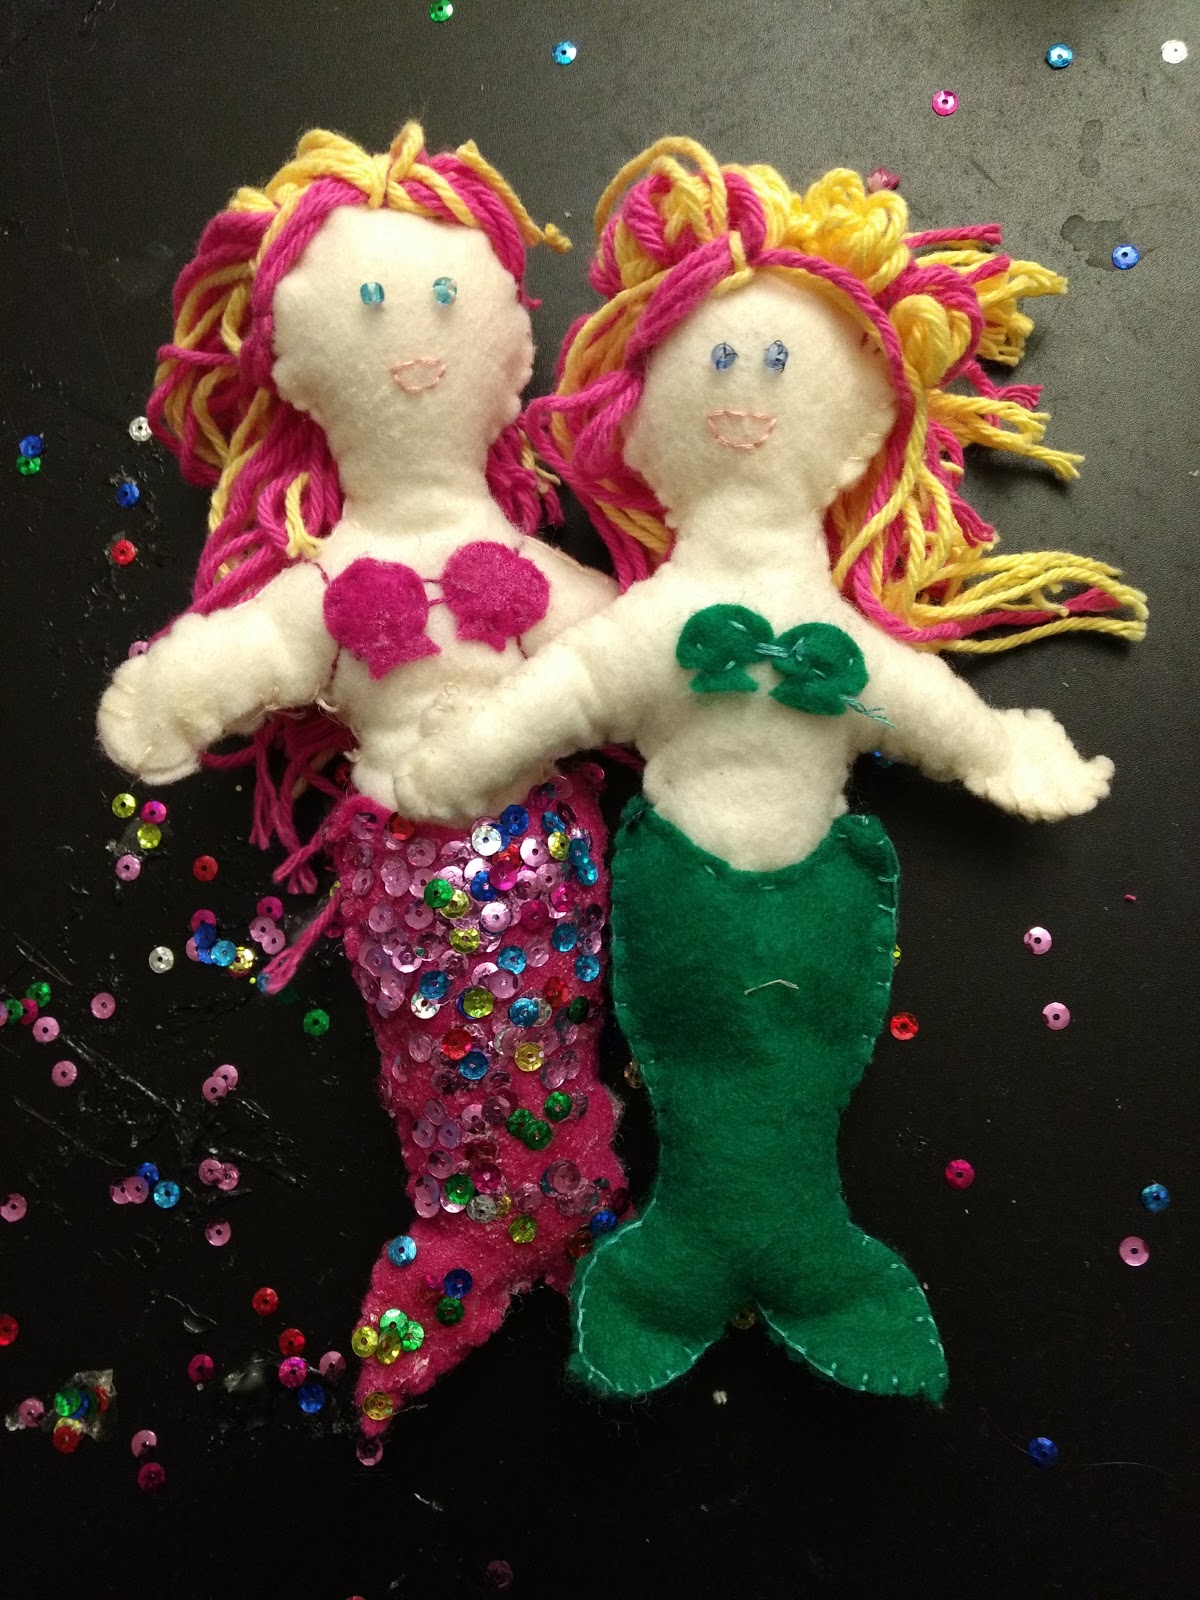
Why do I bring this up? Because on the most recent of these "Poke-dates," my long-suffering husband and I wandered into a Jo-Ann's Craft store where I came across a free project sheet for felt mermaids.

Look, aren't they adorable?
Yeah, I know. The faces, necklaces, and bras are Awful. And they're clearly designed to sell high-profit sequins and stick-on jewels.
But I saw a diamond in the rough. And, I saw a imagination-catching project for both my girls (nearly 5 and newly 7) to practice some real life sewing skills.
So I bought two sheets of flesh-colored felt ($0.78) and a package of sequins ($1.99) knowing the rest of the necessities were in my stash.
Here are ours. I think they turned out great! And yes, the girls were involved with nearly every step.

This is a Joann project, and you can download the free instruction sheet here.
All I'm going to do in this blog entry is highlight a few places we improved upon the instructions, and talk about how I got my fairly little girls involved.
Oh, the sacrifices we make for our kids!


* Lucy had a little sewing experience prior to this, but not much. I used a purple disappearing fabric marker (~$5 on the notions wall) to mark dots at even intervals. I put the dots on top even though her needle was always coming up from the bottom, which was great target practice. She stayed remarkably focused for 10-15 minutes at a time.

Expect to do these steps yourself
Why do I bring this up? Because on the most recent of these "Poke-dates," my long-suffering husband and I wandered into a Jo-Ann's Craft store where I came across a free project sheet for felt mermaids.

Look, aren't they adorable?
Yeah, I know. The faces, necklaces, and bras are Awful. And they're clearly designed to sell high-profit sequins and stick-on jewels.
But I saw a diamond in the rough. And, I saw a imagination-catching project for both my girls (nearly 5 and newly 7) to practice some real life sewing skills.
So I bought two sheets of flesh-colored felt ($0.78) and a package of sequins ($1.99) knowing the rest of the necessities were in my stash.
Here are ours. I think they turned out great! And yes, the girls were involved with nearly every step.
This is a Joann project, and you can download the free instruction sheet here.
All I'm going to do in this blog entry is highlight a few places we improved upon the instructions, and talk about how I got my fairly little girls involved.
General Tips
Fair warning to my followers this is not a "Quick n' Dirty" project. Well, it's a little dirty - let's face it, those sequins are going everywhere! - but it's not quick, and worse, it involves glue. Which I hate.Oh, the sacrifices we make for our kids!
- Substitute! We used tiny pony beads for eyes. We also skipped the stick-on gems, since not only are they pricey, I knew they'd never stay stuck.
- Freehand your pattern! The project sheet tells you to enlarge the pattern to a specific size. I know exactly how to do this using scanner and image editing software, but wanted none of it.
Instead I took a good look at the pattern and free-handed one of the approximate dimensions. (I estimate I saved 30 minutes and untold frustration this way.) If you're freehanding it, just make sure your "hips" are narrow enough to fit - very snugly - in your tail. Also remember you only have to draw one side and then cut on the fold!
(Bonus: Here's a similar pattern in a larger size. I used my printer settings to blow it up. )
I also made a tiny mermaid using the exact pattern from the project sheet. It was fun! Kids will probably want to stick with a bigger one since it's easier to hold, stitch, and stuff. - Modify! I free-handed a couple of "seashells" for a traditional mermaid bra. Ovals would work too. The girls were also very clear what sort of mouths they wanted, and I chose a super light color so they wouldn't look like something from the Nightmare Before Christmas.
- Style! The flyer didn't go into any detail on the hair. I cut an appropriate amount in the right length, folded over, then separated into 5 hanks, each of which I tied around its midpoint with a piece of the same yarn. I sewed 4 hanks set to hang down, evenly spaced just around the very top of the head, on the back side. The 5th I sewed dead center, just to the front, and spread out to each side. I added a stitch or two around a couple of strands at the side of the head to keep it in place. Think of the way you pin back center-parted hair behind your ears (assuming you don't do bangs.)

Hair and face detail.

My "baby" mermaid. About 3 inches tall with sewed on sequins and embroidery floss hair
Kid Involvement Tips
Remember, the goal is to develop skill, confidence, and independence, not to have a perfect project that Mom made when finished! (Yes, self, I am talking to you!)
That said, this is a lot to bite off. Have age-appropriate expectations and expect to get your hands dirty.
(Having trouble holding yourself back? Indulge your perfectionism in your own copy of the project, like my miniature!)
That said, this is a lot to bite off. Have age-appropriate expectations and expect to get your hands dirty.
(Having trouble holding yourself back? Indulge your perfectionism in your own copy of the project, like my miniature!)
For 4 to 6 year olds, consider
- Drawing dots on the fabric where their needle goes in or out *
- Using a simplified stitch - just loop around the fabric for each stitch and ignore the puckering.
- Being aware of their frustration level and ability to concentrate. Break the project up into several sittings. Aim for them to complete 50% or less of the stitching
- Letting them do most of the stuffing. (Use pencils or markers as handy stuffing tools.)
* Lucy had a little sewing experience prior to this, but not much. I used a purple disappearing fabric marker (~$5 on the notions wall) to mark dots at even intervals. I put the dots on top even though her needle was always coming up from the bottom, which was great target practice. She stayed remarkably focused for 10-15 minutes at a time.

See the fun purple dots? They eventually disappear!
For 7 to 10 year olds, consider
- Having them cut their own pattern out
- Teaching them the blanket stitch (Here's a video for you!)
- Depending on patience and interest, aiming for 75% of the stitching
- Teaching them to thread their own needles
- Teaching them to tie knots at the end of the thread. (OK, I didn't. It seemed too hard for either of mine, but maybe in a year or two!)
- Showing them how to measure and cut "hair." (We wound yarn around a piece of cardboard as if making a pom-pom.)
- Separating embroidery thread, cutting appropriate lengths, tying knots, and starting stitching lines
- Embroidering faces (I used the back stitch.)
- Sewing on hair
- Sewing on "bras" (of course you could glue them!)
- Finishing up tricky sewing like attaching the tail to the body


Comments