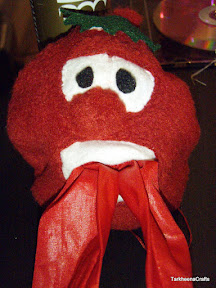
"Bob" Clip-On Bag Holder

I guess I've been a little obsessed with cute but functional containers lately. This "Bob the Tomato" bag dispenser was inspired by this post on "Instructables," but I don't know (or much care) who "Domo Kun" is, so I decided to go with my old favorite Veggie Tales character instead.
I ended up making two versions of this bag holder: the first, made from 4 inch circles, was too small for my shopping bag and didn't look much like Bob when stuffed. (But, I can still use it for my non-rolled diaper bags - see Diaper Disposal Bag Dispenser tutorial from a couple weeks back.) The instructions and pictures are from the larger version, made from 5 inch circles, but if you're careful you can make a smaller version that fits a bit better on a key chain.
Materials:

* Scrap of red fleece, at least 5x10 inches. Felt would work if it needed to, but wouldn't be as strong.
* Scraps of white, green, and black felt or fleece
* Embroidery thread in white and red
* Glue
* Clip of some sort
* Re-usable grocery sack made out of something very compressible like rip-stop nylon. I made mine, but that's a project for a different tutorial. :)
Tools:
* Needle
* Scissors
* CD or glassware for circle template
* Picture of "Bob" to work from
Skills:
* Hand-sewing, including Whip Stitch and straight stitch.
* The confidence to cut out eyes, mouths, and whatnot without much of a pattern.
Instructions:
* Cut out two circles of red fleece using a CD as a template. (CDs are 5 inches in diameter.)

* Cut a hole in one of the pieces of fleece the shape of Bob's mouth. Note: it's hard to get a fabric marker to show up on fleece. You could try a Sharpie, or eyeball it like me. Or you could make a template out of paper and cut around it.
* Cut two rectangles of white felt, each about the size of Bob's mouth.

Arrange on the wrong side of the red fleece such that the bottom piece entirely covers the mouth hole, and the top piece overlaps about 1/2 way.
Sew the "smile" portion of the bottom piece in place using red thread and a straight or back stitch.

Careful: Don't sew the whole mouth shut or there won't be a hole for your bags to come out!
Finish sewing just the top piece across the top of Bob's mouth. (I know, you can't see the stitching in this picture 'cause they're hidden behind the flap.) From the front, it will look like this:

* Cut eyes for Bob out of white felt. On the smaller version I cut two separate circles and simply glued them in place. On the larger version, I cut a pair of joined circles and sewed them in place with a whip stitch in white thread. I stuffed them with minuscule felt scraps - Polyfill would also work, of course.

* Cut a circle for Bob's nose a little larger than it needs to be.
If you're not feeling very confident, you can put a line of running stitches around this circle, add some stuffing, and cinch it partially closed to get the nice "nose" shape. Then, using a whip stitch you can secure it between the eyes and mouth. However, I skipped straight to the whip stitch and just added the stuffing a few stitches before closing the circle.

* Cut and glue tiny black pieces of felt for the pupils. Cut and glue or whip-stitch a scrap of red fleece for his eyelids.

* Make a loop of fleece (possibly from the selvage edge - make sure to cut against the stretch), run it through your clip, and pin it in place on the right side of your second fleece circle. (If you're using split-ring or other openable attachment, you just need to sew in its loop right now.)

Note: Clearly, this should be green, as tomatoes rarely have red stems. But I didn't have any green fleece and wasn't willing to trust craft felt at this stress point. :)
* Place the right sides of your fleece circles together, making sure the clip and its loop are at the top, and are *inside* your "sandwich." Using a whip stitch again, sew the circles together. Make sure to reinforce the loop attachment.

Note: You should be able to turn the finished product right-side out through the mouth hole. If you don't want to risk stretching things, you can leave an inch or so opening for turning, then finish up with a slip stitch once you have it right-side out.
* Cut some "leaves" out of a scrap of green felt. (I cut an oval, folded it in half, and then cut random triangles around the perimeter to get a symmetrical shape.) Cut a slit just large enough for your clip or clip-loop to fit through.

* Slip it on and secure with glue or a few stitches in green thread.

* Hey, you're done! Shove your shopping bag into Bob's mouth, and pat yourself on the back!


Comments