Friday, March 28, 2014

Make a Building Kit with Straws and Pipe Cleaners


Once again, I am beginning a post with the disclaimer that this is not an original idea. I came across it in the April 2014 issue of Family Fun Magazine.  I don't see a link to it on their site, though, and since we added a few twists of our own I don't feel too bad posting our version here. (I really enjoy this magazine, by the way: it has a lot of fun ideas for kids pre-school through teen years. I think we'll be using several of them from the current issue. Oh, and it's fairly cheap - consider a subscription!)

I was immediately excited about this idea because my almost five-year-old son really enjoys building things. He is really attention-hungry and tends to resist solo projects: I anticipated that this project would hold my interest as well as his, and I was right. (To be fair, it may have held mine even a little better than his!)
It's also low mess, low cost, very simple for the adult, and re-usable. All great features in my book!

Here is what you will need

  • Drinking Straws
  • Pipe Cleaners
  • Scissors (that you are willing to use on pipe cleaners!) 


Select the narrowest straws you can find: the friction between the wall of the straw and a double-thickness of pipe cleaner is all that holds your sculptures together, so you want it to be a tight fit.
If possible, find straws without the little bendy bit, since it will be in the way. Or cut it off like we did.

Directions: 
My straws were bendy, so I started by cutting a whole bunch of straws just below the elbow, leaving 6 inches of usable straw.

The straw scraps I handed to the kids with a pair of safety scissors. We haven't done much cutting yet, and straws come highly recommended as an early cutting activity.
Sure enough, my three-year-old entertained herself for a long time chopping the scraps into even smaller bits, laughing when they flew across the room. (Thankfully the baby was napping so I didn't have to spend all my time patrolling the floor for swallowable bits!)
Tip: When we began building we found that 6 inches of straw was a bit much for the larger structures such as the dodecahedron. Consider cutting your straws to 4 inches (as the original directions suggest), or if you've managed to find a bend-free model, cut them in half. Do leave some uncut, though, as you may want to expand your building set later. (See below.)

Next, I cut a bunch of pipe-cleaners into approx. 6 and 3 inch pieces. Not that I measured: I just folded the first cleaner into thirds and cut off the top third. After that I used my original as a template and went to town.


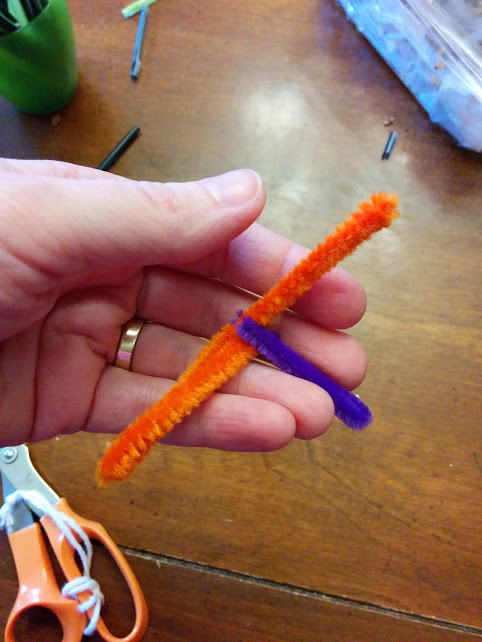
To create the T-connector, place the short section at right angles to the long section, position it in the center, and fold a hook over the long section. Then fold the bottom up. Finally, fold the left and right sections of the long cleaner into the center.
Tip: These do Not have to be perfect! Taking a moment to twist the ends together will help with re-usability, though.

Start Building

That's It: you now have all the pieces you need to make a whole variety of shapes!
If your troops are getting restless, you can build a basic pyramid with only four connectors and 6 straws. Take a break and show them how to build by sliding the T-connector into the end of a straw while you make more connectors.


Tip: By this time my three-year-old was done cutting up straw bits, so I encouraged her to string them onto an extra pipe cleaner. She was far more interested in this than building and created a whole jewelry set by the time we were done.

Taking it Further

After making a pyramid, cube, and finally a rather floppy dodecahedron (pentagon-shaped faces), we were ready to branch out. (And by "we" I mean "I," as my four-year-old would have been happy to abandon the court for some TV time. I, however, persisted!)
My son and I noticed our cube was pretty floppy even with 6 inch sides. I also noted that the 9 inch uncut straws were almost exactly the right size to serve as cross-bracing. (Technically they should have been more like 8.5 inches, but frankly there's plenty of flop in this project!)
Clearly what we needed were some four sided connectors.
Of course, I'd already cut up most of my pipe cleaners, so I ended up making some with the 6 inch pieces, some with 3 inch pieces, and some with 5.5 pieces.  Had I been planning ahead I would have made them all with 5.5 pieces just for the sake making exactly one connector per cleaner. However, all three sizes performed just fine.

Using the four-sided, or "X" connectors as my son dubbed them, we were able to build a house as well as a (partially) cross-braced cube.


By the time we'd got this far, my son really had lost interest, but I have plans to create 5 and/or 6 sided connectors next time we play with these and see just what sort of fun stuff we can create using primarily triangles.

All in all this was a really fun way to spend about 90 minutes with the kids, and since everything comes right apart and packaged up compactly, I expect to pull it out many times in the future. I also suspect it will grow with the kids quite nicely: it could be a real boon when teaching geometry - not to mention structural engineering!



Tuesday, March 25, 2014

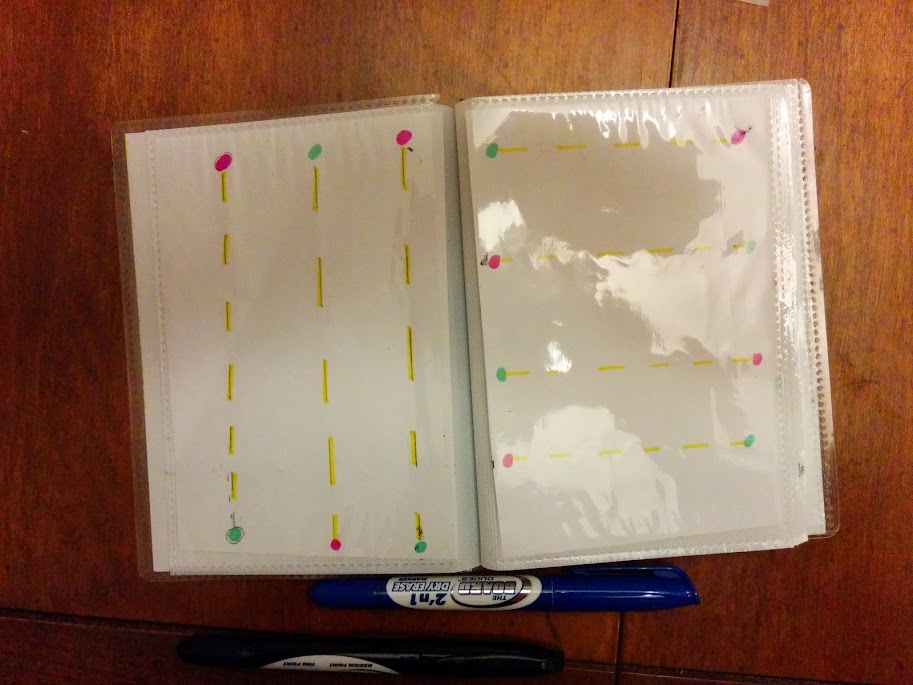
Quick n' Dirty Tracing Book from Dollar Store Photo Album

Today's DIY: Make a tracing book for your pre-schooler using a dollar store photo album.

Let me be sure to state right up front that this idea is Not Original. I don't remember exactly where I came across it first - Pinterest, I am sure! - but it's out there.
For instance, here's a Mommy who did it Much better than I did.  Of course, it also took her a lot longer. She had to create, resize, and print the letters, cut them out and mount them on card stock.
I did something similar for my 4 1/2 year old son, but I went even a step further and laminated the cards and hung them on a ring.  The project must have taken me at least 2 hours and consumed several rather expensive laminating sleeves.  Guess what: it is like pulling teeth to get him to use it!
My son's beautiful, laminated tracing cards. That he mostly won't touch!

Admittedly the kid can be a mite contrary at times (and sometimes the rain is wet, too!) He seems to sense a learning activity 3 miles off and dig in his heels at the slightest hint.
Needless to say, we're going to have to work on this tendency if the whole homeschooling thing is going to work! But whatever the reason, my project violated my favorite DIY maxim:


A good homemade toy is one your kid plays with. 
A great homemade toy is one your kid plays with longer than it took you to make it

Anyway, this morning I was in a bit of a hurry, but I wanted an activity for his (far more compliant) 3 year old sister while I put the baby down for her nap, so I put together a quick n' dirty tracing book.

If you'd like to make your own,
You will need: 

  • 4x6 photo album from Dollar Tree or similar. (Try to find one that will open and lie relatively flat) 
  • Copy paper or 3x5 index cards
  • Sharpies
  • Scissors
  • Fine or medium line dry-erase marker

Here's How I Did It: 

1) Cut a stack of roughly 4x6 rectangles from my copy paper. (Actually, since I am a measure-once cut-three-times sort of girl, they were much larger than 4x6 at first. You get the picture!)

2) Using Sharpies, drew a series of tracing activities on the paper.

  • One page was devoted to straight horizontal lines
  • Another was devoted to straight vertical lines, and another for diagonal ones. Finally, I added some circles. 
  • To aid in both learning to follow directions and form letters properly, I added green dots at the beginning of each line and red at the end. 
  • Having run out of lines, I devoted 5 more pages to the letters of her name, which we've been working on recognizing the last couple of weeks. I also added the red and green dots here. 


Note: I got my tracing ideas from ABC Jesus Loves Me, a wonderful site with a wonderful free pre-school curriculum that I am not using because I am simply Not That Organized right now. (And also, the whole contrary thing!) Anyway, I have full pages of her tracing activities printed out and laminated, but they're getting grungy and bent, plus they're hidden somewhere in my stuff... this was both faster and more portable for our afternoon trip.

3) Put the pages in the book and handed it to her with a dry erase marker. Approximately three minutes of instruction and pencil grip reminders, and I was upstairs with the baby!

Seriously, the whole project took me 20 minutes, maybe less. I've recouped double my time investment in a single day!

If sufficiently motivated I will add more things to trace - perhaps a whole alphabet, maybe even printed.  Or maybe not: she loves simply coloring, and if some of the marker ends up on the less-erasable plastic between the page protectors, who cares? It cost $1 and took 20 minutes!
I do love the idea of being able to almost instantly customize what she has to work on.
I expect to be using this idea when it comes time for her brother to work on his numerals and lower case numbers too.

Saturday, March 15, 2014

Crocheted Mini Leprechaun Hat

Just in time for St. Patrick's Day, here's a quick crochet pattern for a leprechaun hat. Whip one up (it took me around 30 minutes) and leave it with a couple of "gold" chocolate coins on the breakfast table for your kids to find!

Materials: 
Small amount of green yarn, worsted-weight
Small amount of black and yellow crochet thread or embroidery floss

Gauge is not important, but I used an "F" (3.75 m) hook for the hat and a #1 hook for the band.

Stitches: 
hdc = half double crochet
hdc2tog = half double crochet 2 together (decrease)
sl = slip stitch
ch = chain

Hat, in green
Tips: You will be be crocheting in front loops only on row 3, and back loops only on row 6. Here is an good explanation of which is which.
R1: 6 hdc in magic circle, sl to join
R2: ch 2 (counts as hdc), 1 hdc in same stitch, 2 hdc in each of next 6 stitches (12 total). Join with sl
The flat part of the crown is complete. The next row is worked with the hdcs in front loops only. The front loops are the ones closest to you. 
R3: Ch 2 (counts as hdc). Working in front loops only, 1 hdc in each of next 11 remaining stitches (12 total). Join with sl
(note: in row 4, you are going to decrease twice. Space them however you'd like - just not right next to each other!) 
R4: Ch2 (counts as hdc). 1 hdc in each of next 2 stitches, hdc2tog, 1 hdc in next 3 stitches, hdc2tog, join with sl. (10 total)
R5: Ch2 (counts as hdc). 1 hdc in each of next 9 stitches (10 total)
Now, time for the brim. This row is worked in back loops only. The back loops are farthest away from you. 
R6: Ch2 (counts as hdc). Working in back loops only, hdc in same space. Still in back loops, 2 hdc in each stitch around. (20 total.)
Fasten off and weave in ends.

"Belt", in black
If using crochet thread, switch to a smaller hook. I used a #1.
R1: ch 20, or as many as necessary to go around hat at brim. Join with sl.
Leave a short tail, and pull through to inside of hat. Sew a couple of stitches to fasten it down if desired.

Buckle, in yellow
R1: ch 4-5, or as many as necessary to make a loop large enough to go around the belt.
Loop around the belt and sl to join.
Leave a short tail and pull through to inside of hat.

And you're done!
What fun things can you think of to do with a miniature leprechaun hat?


Pre-School Chore Chart

My husband and I want our kids to learn the value of work early in their lives. The "Entitlement" mentality is so pervasive in our culture, and so absolutely poisonous that we want to do anything we can to fight it. One of the things we're doing is starting the kids out with some simple, achievable chores while they're still pre-school aged. And, because we also want them to learn the value of money, some of these chores are paid.

I know, there are at least as many as schools of thought on the subject of allowance, chores, and kids as there are parents, but this is our very basic breakdown:
Basic Individual Responsibilities are unpaid. These include things like picking up toys, getting clothes into the laundry baskets, clearing their dirty dishes, etc.
Chores that benefit the Whole Family are paid. Some examples are vacuuming common areas, emptying the dishwasher, emptying the dryer, feeding the cat, etc.
Admittedly, there are some grey, ambiguous areas. Setting the table benefits the whole family, but we do not pay for it. Vacuuming bedrooms will probably be a paid chore. Our choices will undoubtedly evolve over time, and I'm not at all sure that the specifics are as critical as they seem up front. If our children simply learn (a) work is necessary, (b) work can have very positive benefits, (c) money is earned by work and therefore should be spent carefully, I think we will have succeeded.

That, of course, is not what I set out to blog. I actually just wanted to share the simple chore chart that has been working for our three and four year olds for the last year.


I printed this chart, laminated it, and hung it on our magnet board. (Fair disclosure: I did not make the clip-art images, nor go to much trouble to make sure they were intended to be free. Use as your conscience dictates!)
Also on our magnet board are these nifty dry erase markers with magnetic lids. Each time a chore is completed, the child selects his or her color of marker and fills in one of the pieces of money next to the chore he or she just did.
At the end of the week (or, frankly, whenever it starts to fill up and we remember to do it!), Daddy adds up what each child has earned and pays up.  The money goes straight to the piggy banks, where - for the moment - most of it is being saved. What happens next is a topic for another post. :)

For the record, here is a list of the chores our kids are doing now:

  • Emptying the dishwasher (of silverware and their plastic dishes). $0.25
  • Emptying the dryer and cleaning the lint trap. $0.10
  • Vacuuming or sweeping. $0.25/room. 
  • Cleaning doorknobs and light switches (with vinegar) $0.25/zone
  • Feeding the cat. $0.05/time 
* The kids need a lot of help with vacuuming and sweeping, of course.  We have a light battery-operated vacuum, but it's not super effective. My oldest (nearly 5) can handle the big vacuum to a certain extent, but I certainly have to help moving it from place to place, plugging it in, etc. Sweeping is something both are willing to Try, but neither is actually very good at. 
This brings up another point that is worth emphasizing (Hey, self, I'm talking to YOU!). 
At this stage in our lives, it will always be MORE WORK for your kids to "HELP" with the chores than it is to do them ourselves! 
I admit it: the kids rarely do the dishwasher chore right now. I haven't got it in me to interrupt myself in the middle of the empty-and-reload task that seems to need doing 24 hours a day, but mostly at breakfast time when the kids are legitimately busy eating. And that's OK: I'm not going to make a religion of this chore thing! 
On the other hand, we're training the kids for independence and responsibility here. It is harder right now, but by the time they're 8 or 10, many of these chores can be done solo. That's the payoff we're working for! 


Finally, a couple of resources:
First, here are Dave Ramsey's thoughts on chores and allowance
Second, here's a list I've seen many places of age-appropriate chores for kids.


Monday, March 10, 2014

Pin the Towel on the Rack

Every time I went into the bathroom, the hand towel was on the floor. Every Time. Is it the fault of the slippery towel rod? Perhaps it's the too-short towel. Or maybe it's simply the fact that the rack is mounted about 6 inches above my kids' heads!


And it suddenly struck me one day that I was wasting way too much time mumbling (or worse) under my breath about the problem and waiting for my kids to grow another foot. I pulled a clip out of the kitchen drawer. I used it to clip the sides of the towel together under the rod. Problem solved.  No more mumbling under my breath. Happy Mommy.

Hi-Ho Pom-Pom O?

Ah, Hi-Ho Cherry-O, the bane of my game closet. I can't stand it.  My son (4 1/2) asks for it regularly, but we rarely make it through the fussy, complicated set-up - quite possibly because my daughter (3) just likes playing with the fruit. The tiny, candy-colored fruit that inevitably gets knocked into and onto the floor where my other daughter (11 months) can grab it.  Most other parents that I've talked to have similar feelings of loathing - and yet we all seem to own a copy!

On the other hand, it does promote a couple of useful skills like counting, turn taking, and (arguably) dealing with set-backs when that stupid bird steals your fruit!
I brainstormed a Hi-Ho replacement that incorporates these skills and even adds some pincer-grip practice. I'm dubbing it (oh-so-creatively) "Hi-Ho Pom-Pom-O!"

Materials: 
  • Pom-Poms, at least 10 in each player's chosen color
  • A large bowl plus a smaller cup or bowl for each player
  • (Optional) Child-sized tweezers (Mine look like these
  • The spinner from your Hi-Ho Cherry-O game, or a die works too! 


Play: 
Each player spins the spinner and uses the tweezers to pick that many pom-poms in his or her color out and place them in his or her container.  First one to transfer all the pom-poms wins!
For younger or more easily frustrated players, feel free to either re-spin when hitting the bird, dog, or spilled bucket. I actually just modify the consequences a little so you never have to put back more than 2 pom-poms.

After you're done, the kids can use the tweezers to sort the whole bag of pom-poms by color, possibly into an old candy box or chips-and-dip bowl.  Or they can throw them at each-other, blow them out of marshmallow guns, or check out one of these Pom-Pom Party games!

Tuesday, March 4, 2014

DIY Learning Games

In my last post, I shared how I created a Customizable Game Board, flexible enough to support a whole host of learning games. (Update: Here's another method for making a customizable board)
In this post I will share a number of games you can play using this board.  Of course, you don't have to make the reusable board in order to play them: you can always draw a custom board for any of the games!

Note that each of these games is targeted to kids between 3 and 5 years old. I would love your ideas for games for older children!

Before we begin, however, let's explore a few

Options for random number generation

Every game needs a random element, and there are three basic methods for generating one
First: The classic die. (Hint: If you are tired of chasing them under tables and restoring toppled playing pieces, you might want to try rolling a die in a bubble! We have also used a basic clear Tupperware container to good effect.)
Of course, dice come in more than simple 6-sided cubes: check your local school supply or gaming store for 8 sided, 10 sided, even 20 sided or more dice.  Or, go really high tech and look for a dice rolling app for your smart phone!

Second: The spinner. Also can be complicated for little hands, but it's good practice, so consider raiding your game closet for options.  The "Life" game, for instance, has a nice 10-number spinner.  Or, make your own from an old CD or DVD.

Third: The Draw Pile. In other words, slips of paper, cards, tiles, or whatever drawn from a face-down pile or opaque bag.  Certainly the most flexible of the options, but potentially the most labor intensive as well.  Once again, it's a good thing for little ones to practice, but be prepared for some serious coaching as they grab too many, spill the sack, or simply take forever to pull their hand out.

In each game description that follows, I've mentioned the random generator option that we chose, but should always feel free to select a different one.  Simply switching from rolling a die to pulling a number out of a bag can make a whole new game!

Game #1: Follow The Yellow Purple Brick Road


Concepts: Following a path, Counting, Shape Recognition (optional)
Materials: 


Setup: 
(optional) Use dry erase marker to draw basic shapes on each square on the game board, as shown in photo. Draw arrows in the direction of travel

Game Play: This most basic game is appropriate for the youngest players, and those just learning the concepts of following a path or counting.  The rules couldn't be simpler: each player rolls a die and moves that number of spaces ahead on the path.  If you have drawn shapes in each space, the player should name the shape he or she lands on.  First player to the finish line wins!

Variations: 

  • Roll two dice.  Player identifies the larger number and moves that number of spaces ahead. (We found one that has numbers rather than dots, adding an extra element) 
  • Assign penalties and/or rewards (one space ahead or back) for correctly identifying the shape on your space
  • Replace shapes with letters, sight words, etc. 


Game #2: I've Got Your Number! 


Concepts: Counting, Number recognition, (Optional) Greater Than / Less Than
Materials


Setup: 
Use dry erase markers to write numbers 1-6 on each space on the game board

Game Play: Each player rolls a die.  He or she announces the number on the die, and then advances to the nearest matching number on the game board. 

Variations: 
  • For older players: Players may chose to advance either the number of spaces shown on the die, or to the nearest matching number on the board. Have player count the number of spaces between his playing piece and the nearest number match, and compare it to the number on his die.  
  • Use a 10-number die (and add the additional numbers to the board, of course!) 

Game #3: The Color of Fun

Concepts: Color matching, Following a Path
Materials
  • Customizable Game Board (or draw your own on paper!) 
  • Playing pieces for each player
  • Die with 3 to 6 colors instead of numbers, or a Draw Pile containing colored chips or the like
  • Dry erase markers matching your die or draw pile colors
Setup
Use the dry erase markers to color a portion of each space on the game board
(Optional) Add one or more shortcuts or back-tracks - think "chutes" and "ladders" - using a black dry erase marker.  Mark with arrows in the direction of travel. 

Game Play: Each player rolls the color die, or selects from the draw bag / pile. After naming the color, he or she then advances to the nearest space marked with that color.  If the nearest space is already occupied by another player, he or she advances to the next closest matching spot.  (This works better when there are only a few colors in the game, or when the path is quite long.)  
If the player's piece comes to rest on a spot containing the entrance to a shortcut or a back-track, he or she immediately moves it to the other end of the feature. 

Variations
  • Add some action to the game: Have the player get up and touch something in the room that is the color he or she rolled. Increase the difficulty by requiring it to be a Different object each time.  
  • Talk about whether the color rolled is primary or secondary.  If secondary, talk about which colors may be combined to create it.  

Game #4: Alphabet Hop


Concepts: Letter recognition, matching, etc. 
Materials 
  • Customizable Game Board (or draw your own on paper!) 
  • Playing pieces for each player
  • Letters borrowed from a puzzle or magnet set, or pieces of colored card stock with your letters written on them
  • Dry erase markers matching your draw pile colors
Setup
  • Choose 4 or 5 letters and, using different colors of dry erase markers, lay out your game board.
  • Create your draw pile. Place letters from your puzzle or magnet set in a small, opaque bag. 
  • For a simpler game, match the color of the letter in your draw pile to the color on the board.  For a more advanced game, make them different colors.
Game Play
  • Have player draw a letter out of the bag.  Player then advances his or her playing piece to the appropriate letter. 
  • If playing with the advanced rules, player may choose to advance Either to the Letter he has drawn or to the Color of his or her letter. 
Variations
  • Have older players name the letter that their playing piece is sitting on. Or if this is too easy, name a word that starts with that letter (Younger players can name the color of the letter or square)  
  • Use upper case letters in the draw pile and lower case letters on the board, or vice versa
  • Practice the sounds each letter makes
  • Use blends ("sh," "th," "pl," etc.) instead of single letters and practice the sounds
  • Fill the draw bag with small plastic toys each of which starts with one of the letters on your game board. Players advance to the letter matching the beginning of the toy's name.  

OK, so those were four different games we've played on this system.  My head is buzzing with ideas for more, but I'd love your input. 
What game ideas do you have?  What works well and what doesn't?