Sunday, November 27, 2011

Mini Crochet Christmas Tree

Here's another quick n' easy crochet ornament for you. I am developing these to decorate my Vintage Granny-Square Christmas Stockings.


MaterialsA few yards each of yarn in green, brown, and your choice of contrasting color

Tools
Crochet hook (mine is "G" gauge)
Scissors

Stitch Key
ch = Chain
hdc = half double crochet
dhdc = decrease half double crochet *
sl = slip stitch

* Thanks to the author of this Baby Cloche pattern for the following description of the "decrease half double crochet:"
To dhdc, (yarn over, insert hook in next hdc, yo, draw loop through) two times, yo, draw through all 5 loops on hook]

Put another way, you are performing the first half of a half-double-crochet in the first stitch, but instead of completing with yarn-over and pulling through the two loops, instead yo and insert hook into the *next* hdc stitch and proceed as normal for another hdc, finishing by pulling the yarn through all five loops.
Clear as mud? Look it up on you-tube! ;)

Instructions
Tree
Constructed from the bottom up.
Row 1: ch 11, turn, and hdc in second ch from end. hdc in remaining 9 ch stitches for 10 total
Row 2: ch 1 and turn, dhdc in first two hdc stitches. hdc in next 6 stitches. dhdc in last two stitches. (8 total stitches)
Row 3: ch 1 and turn, dhdc in first two hdc stitches. hdc in next 4 stitches. dhdc in last two stitches (6 total stitches)
Row 4: ch 1 and turn, dhdc in first two hdc stiches. hdc in next 2 stitches. dhdc in last two stitches (4 total stitches)
Row 5: ch 1 and turn, dhdc in each of the four stitches. (2 stitches total.)
Row 6: ch 1 and turn, dhdc in the two stitches. (1 stitch total.)

Star
Foundation: ch 4 and join with sl
Row 1: Ch 2 (counts as first hdc), then sl in ring. Repeat 1 hdc, 1 sl four more times for a total of 5 sets. Join with sl stitch.
Attach to tree top.

Trunk
Attach brown yarn in 5th stitch at bottom of tree and ch 2.
Depending on preference, hdc in next one or two stitches.
If desired, ch 2, turn, and complete second row.

Friday, November 25, 2011

Toddler Toys: I Spy Jar

Anyone who actually follows this blog, poor soul, will have noticed that I am all over the map lately. You never know if you're going to get a digi-scrap post, recipe, toddler tip, or even a crochet pattern. I'll give you a clue to the common factor: practically everything can be done in 30 mn or less, with a distracting child or two in the room!

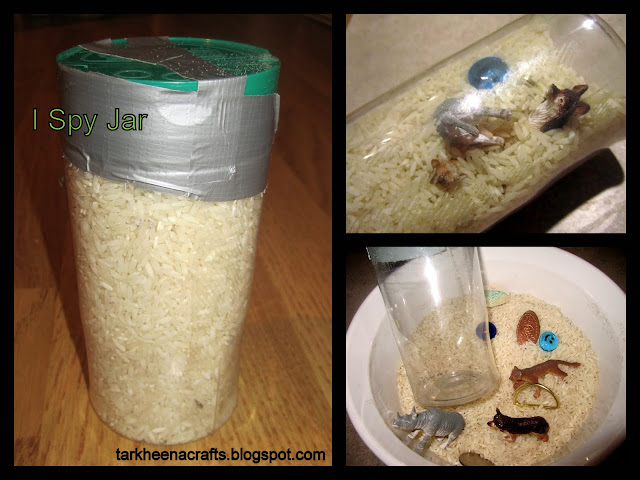
Today's second project: The "I Spy" Jar.
For several years, a couple of "Find It" games have been showing up at our annual church retreat. Filled with colorful plastic "sand," these approx. 12 inch tubes also contain about two dozen small plastic objects which may be revealed by carefully shaking and rolling the container. The object is to check off each hidden object from the list - including the always elusive penny. They're surprisingly diverting for adults and kids alike. They're also about $25 from the manufacturer!
My version is essentially free.


Materials
1. Sturdy clear plastic container with lid (I used a small Parmesan cheese container)
2. A handful of small toys, buttons, beads, coins, marbles, and other found objects of your choice
3. Enough rice to fill the container to within about 3/4 of an inch of the top.
4. Heavy tape (duct or electrical) to seal lid, or glue if you want to make it really permanent.
5. (Optional) Laminated checklist of all hidden objects.

Instructions (like you need 'em!)
Combine rice and found objects in jar. Seal lid with heavy tape or glue.
If desired, create a checklist of objects to be found and challenge your kid (husband?!) to complete it during a long car trip. If your child is a pre-reader, consider photographing each object and making a pictorial checklist.

(I know, it could be Much prettier. The duct tape is quite unattractive. If you need it to look nice and Don't need it to stand up to small children, you could glue a piece of pretty scrapbook paper around the taped edge, but be sure not to obscure too much of the tube or you rather defeat the purpose!)

My two year old actually played with this thing for 15 minutes tonight despite having entered the "manic" phase of tiredness.
A teacher friend of mine thought they may also be useful for some of her older students who just can't sit still. Or, depending on how much of a sense of humor your guests have, consider placing one in the bathroom during a party in lieu of those dated magazines! :)

UPDATE
I made several of these as Christmas gifts for kids in our lives, and here's what I did to make them prettier
1. I dyed the rice so it wasn't simply boring white. Since these were Christmas gifts, I went with red (OK, pink) and green, but the sky's the limit.
Here's a blog explaining how to use water colors to dye rice: http://homemadeserenity.blogspot.com/2011/01/why-dont-you-make-rainbow-rice.html

I went a different route and used food color and vinegar - essentially the same method as dying easter eggs. Mix water and vinegar about 50/50, color with food coloring, and add only liquid enough to barely wet the rice you are dying. Use a jar or a zip-lock, and mix it around well, then let it sit for several minutes to get darker.
My method yielded far paler results than the watercolor option above, though.
The important part is to let it dry REALLY well (I spread it on a cookie sheet and put it in a warm oven for a while) before sealing it in the I-Spy jar. We don't want mold!
2. I glued, rather than duct-taped, the lids.
Honestly, this is a dicier proposition than it seems it ought to be. I had very bad luck when trying to hot-glue a metal lid to a glass jar for another project (the glue was too thick, interfered with the threading, and really didn't stick to such non-porous surfaces very well), so this time I didn't even attempt it. I used Elmer's and let it dry over night. It Seemed to be holding, but I think a really determined child could get it off. Super glue would probably be your best bet.

3. Before filling the jars, I photographed the group of items that would be included. I printed it at about 3x4 inches, laminated it, hole-punched it, and tied it to the jar with a stretchy cord. The plan is for the kids to use the card as a challenge, and to stretch out the game a little - "can you find the red bird? No, that's the blue one: keep looking!" Theoretically dry-erase markers or crayons could be used to mark off each item as it is located. You could have your kids race, use it as a "time out" timer ("You must find 10 items before you can get up from that chair!"), etc, etc.
Of course, if your target audience is able to read, you could simply make a text list of the items. That's how the commercial jars are labeled.

Quick n' Easy Crochet Wreath Ornament

I've picked up my hook again this season: my first project was my daughter's Christmas Stocking, but I got inspired and starting making hats. Finally, I started visualizing ornaments I could add to my stockings. Grammy's were made of felt, but I'm feeling more comfy with the hook this year, so here's a cute little wreath for your tree, hat, headband, or you name it!

Materials:
Yarn in green and contrasting color of your choice

Tools:
Crochet hook (I used size G)
Scissors

Key:
ch = chain
hdc = half double crochet
dc = double crochet
sc = single crochet
sl = slip
st = stitch


Here's those instructions again, in case you can't quite see 'em in the photo
1. ch 12 and join with sl st to form ring
2. (Round 1) ch 2 (counts as first hdc), 12 more hdc in ring; sl st to join
3. (Round 2 - eyelet) ch 3 (counts as first dc + ch 1). dc + ch in each hdc st below; sl to join
4. (Round 3 - scallop edge) sc, hdc, sc in space formed by ch 1 below. sl st in top of dc. Repeat in each ch 1 space for 13 total.
5. Chain 50 to 70 in contrasting color. Weave in and out of eyelets in row 2 and tie bow.
Optional: Glue on felt or sequin "ornaments" as desired.

Tuesday, November 8, 2011

Recipe: Salsa Sausage Sandwich Braid (Adapted)

Another adapted recipe today, this time from my favorite paper cookbook "Family Feasts for $75 a Week" by Mary Ostyn. The original recipe may - and should be! - seen here.
I cannot say enough good things about this practical, frugal cookbook. Seriously, go buy it!

In the meantime, I've made the sausage braid about 3 times now, and while the concept is good, we weren't thrilled with the flavor of the filling, which tends towards the bland. Part of this, I freely confess, is undoubtedly because I rarely have on hand (or remember to buy) things like green onions, fresh parsley, and bell pepper, which are therefore left out of the recipe. The modifications I've made speak both to our flavor preferences and compensate for what is most likely to be in the fridge or freezer.

Ingredients
1 pound bulk sausage (the stuff that just looks like ground beef), pork, chicken, or whatever you like.
1/2 cup chopped onion (I use frozen pre-chopped. No tears!)
1/4 cup chopped green bell pepper (optional)
2 green onions, chopped. (optional)
1 clove garlic, minced (I buy pre-minced in a big jar and just put in a large spoonful.)
4 ounces cream cheese, cubed
1/2 - 2/3 C salsa, your favorite brand
2 loaves frozen bread or pizza dough, thawed, or make your own pizza dough in the machine (recipe below.)
1 large egg, lightly beaten
Smoked paprika or your favorite seasoning blend (I use one called "South African Smoke" from Trader Joe's)

Directions
1. Pre-heat oven to 350. Brown sausage in a frying pan along with vegetables (except green onions if using) until meat is cooked and veggies are tender.
2. Drain fat if necessary. Add green onions, cubed cream cheese, and salsa to skillet and cook over low heat, stirring frequently, until cheese is melted.
3. If using commercial frozen dough, knead both lumps into one. Roll out to at least 10x12 inches (I usually end up more like 12x16) and place on a baking sheet.
4. Spread sausage mixture down the middle, leaving 3 inches to each side and 1 inch at the end bare.
On each long side, cut 3/4-inch-wide strips 3 inches into center of dough, right up to where the filling starts.
5. Starting at one end, fold alternating strips at an angle, forming a braid over the filling. Crimp the ends of the dough to close the ends of the braid.
6. Brush loaf with beaten egg, then sprinkle generously with smoked paprika or your favorite seasoning blend.
7. Bake at 350 for 20 to 25 minutes, until golden brown.
Allow to cool slightly, then cut into 1 to 1.5 inch slices.

Feeds about 4 adults.

Tips and Justifications:
I like to consider myself reasonably frugal and above-average in the kitchen (if not anything like a gourmet.) So I'm not immune to the argument that a premium is being paid for the convenience of frozen, sliced onions and refrigerated, diced garlic. However, I have lost track of the half-onions I've thrown away, not to mention the dishes not made because I haven't got one in the house. I think it evens out. Ditto with the garlic, which is even cheaper. (Also, I really hate processing both!)
I also buy a lot of frozen bell pepper and onion mix for recipes like this one. Yes, there's a fair bit of cheap onion in with the expensive peppers. But look at the price of bell pepper most times of year - contrasted with about $1.65 for 12 oz frozen!

Bread Machine Pizza Dough Recipe
(origin forgotten - online somewhere!)
1 1/3 C warm water
2 T oil
1-2 T honey or sweetener of choice
1 t salt
2 C white bread flour
2 C whole wheat bread flour
2 t (or one packet) yeast

Add to machine in order listed and choose the "dough" cycle.

Makes about 15-20% more than you need for one sausage braid
(I rolled out the left-over bits, brushed them with egg, and sprinkled with cinnamon and sugar, and baked right along with the sandwich.)
Alternately, makes enough for two, 14 inch pizzas - or one and an order of cinnamon rolls!
Also freezes well, but allow 3-5 hours for thawing in the fridge, and another to rise at room temp.

Monday, November 7, 2011

Simple Pumpkin Molasses Cookies - Adapted from Bakers Royale


This recipe is adapted with only a few modifications from this one at Bakers Royale. All credit should go to her, but my modifications were key enough I thought they should be written down - for my own benefit if no-one else's!

Every year about this time I go on a pumpkin kick. This year I've even taken the wild step of rendering my own puree. My favorite applications are baked goods - primarily cookies and breads. Usually I fill everything full of chocolate chips, but these cookies are an actually welcome exception. The end product are soft, cakey, and taste

Makes about 30 one and a quarter inch cookies. | Preparation: Heat oven to 350 degrees and line cookie sheet with parchment paper, or lightly coat with cooking spray.

Ingredients
½ cup of butter, melted (not hot)
1 large egg
1 1/4 cup of granulated sugar
½ cup of dark brown sugar, packed
1 tablespoon plus 1 teaspoon of unsulphured molasses
¾ cup pumpkin puree
2 teaspoon of cinnamon
1/2 teaspoon nutmeg
1/2 teaspoon ground ginger
1/2 teaspoon cloves
1/2 teaspoon allspice (optional)
1 teaspoon of baking soda
1 teaspoon of salt
2 cups of flour
Instructions
Combine the melted butter, egg and sugar in a large bowl. Mix with hand-mixer for about 1 minute. Add in pumpkin puree, molasses, and spices; mix for another 1 to combine. Add in baking soda and salt and mix to combine.
Using a sturdy spatula or wooden spoon, add in flour into wet mixture. Using a small ice cream scoop, drop dough onto parchment lined (or lightly greased) cookie sheet and bake at 350 degrees F for about 10 minutes or until bottoms of cookies are a slightly darker than the top.

Tips
If, by any crazy chance, you are the sort of person who makes her own puree from fresh pumpkins, you probably already know that it tends to be wetter than canned. (Especially if you have foolishly added even more water to help it go through the blender!) Be prepared to add anywhere from 1/4 to 3/4 C extra flour to make the dough stiff enough to hold its shape.

Tuesday, November 1, 2011

Todder Tools Quicky: Build a cheap faucet extender

My 2-year-old needs to get used to washing his hands in the sink. The problem is, he's *short!* An adult can hold him up, but usually at the expense of squishing his belly, and getting water everywhere at the same time. Yesterday we picked up a couple of fairly tall plastic step stools at Ikea ($8, not available online.) They get him most of the way, but he can still just barely get his fingertips into the water.
Google quickly reveals that I am not the first person to have this problem: a neat little product called the "Aqueduck" is on the market. It's simply a duckbill-shaped piece of plastic that attaches via a shnazzy silicone sleeve to your faucet, channeling the stream of water out another 6 inches or so. Simple, elegant - and expensive! (About $13 plus shipping - and I needed two!) Certainly I ought to be able to jury-rig something for a fraction of the cost. While one part of my brain was planning a trip to the hardware store, the other part noticed that he was playing with his "glow sword" - just a glow-stick with a dagger-shaped handle we got at the Dollar Tree for use while trick-or-treating. (Ironically, the stupid glow stick didn't even work!) He'd managed to fling it across the room, snapping the handle into two halves on impact. He demanded that I fix it... while I noticed that it was roughly the right length and width to serve as a faucet extender. A piece of electrical tape later we had our solution.
Not elegant, not permanent (I don't expect the tape to last long - it'll probably have to be changed at least as often as the sink is cleaned), but it does the job. Total cost: $.50 per faucet, plus the kid gets to play with a glowing sword before you make it! (OK, $.51 if you count the tape, which is also available at the Dollar Tree, of course!)
If you don't happen to have a glowing sword lying about, I expect there are dozens of objects in your house - probably many in your recycle bin - that could accomplish the same goal. I considered a plastic water bottle or yogurt container. But any of these ideas seemed to need careful scissors work and had the further risk of sharp edges. This does it in one step.

*Update: 6 months later, we're still using the same piece of electrical tape.  Amazingly hardy stuff!  :)