Saturday, June 27, 2009

Make a Monster from Dollar Store materials

Browsing through the dollar store the other day, a couple of bright soft cleaning clothes caught my eye. They seemed far too pretty to be used for so mundane a task as dusting so I took them home and turned them into a monster for my little boy.


Materials:

* Two cleaning clothes from the dollar store in different colors
* Thread or embroidery floss in colors to match the fabric
* Small amount of Polyfill stuffing, or use fabric scraps.
* Two safety animal eyes (optional: you could use buttons if not giving to a small child, or embroidery)
* A small pill box with a tight fitting lid and a few kernels of unpopped popcorn or rice (optional, for rattle. I got my pill box at REI for $0.40. You could also use a plastic cap from a pop bottle sealed with a piece of cardboard and tape, although this would render the finished piece unwashable. You could also use a jingle bell, with the same drawback.)

Tools:
* Scissors
* Paper for making the pattern
* Needle, or sewing machine

Skills:
* Hand sewing or machine sewing
* Confidence to draw your own pattern

Instructions:
* Draw pattern on 8x10 piece of paper, using photo as a rough guide.

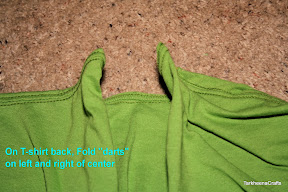
The basic shape for the body is a squared-off egg. I traced around a water glass for the curve for the head. The arm / leg shape is roughly the same, but at about 1/6 the size.
* Cut the pattern out with paper scissors. Use pins to attach to cleaning clothes and cut pieces as follows
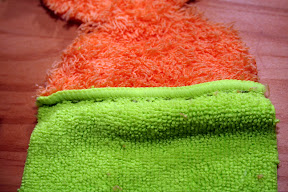
* Cut two body pieces from green cloth, with the edge along one of the "selvages" (that is, the finished edge) of the cloth
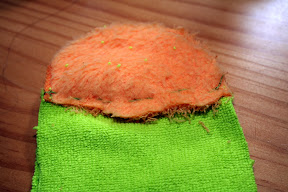
* Cut two head pieces from the orange cloth, adding about 1/2 inch for seam allowance
* Cut eight arm / leg pieces from the second cloth
* Match one head and body piece, sliding the right side of the head under the right side of the body about 1/2 inch. Sew with a simple running stitch.


* Match the wrong sides together of the arm / leg pieces to make four sets. Sew with a running or whip stitch. I found a whip stitch easier as it made for a smaller seam allowance.
* Turn arms and legs right side out and stuff with a small amount of polyfill

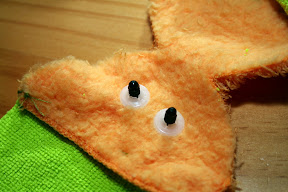
* To attach the safety eyes, cut two very small slits in the face piece in the desired location. Slide the eyes through and fasten the washer. It takes a little muscle to get it on, but it won't easily come off again!

* On the right side of the monster, lay out the arms and legs on the right side of the monster body as shown in the photo

* Lay the other half of the body / head piece over the top, right side down. Pin arms and legs in place firmly.
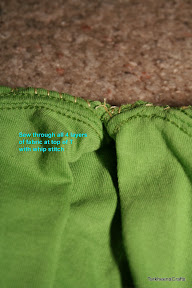
* Sew body pieces together, taking care to go through all four layers at arms and legs. Again, I found a whip stitch easiest. Be sure to leave 1/2 of the head open for turning!
* Turn the monster right side out.
* If making a rattle, add the popcorn to the pill box. If desired, super-glue it shut to make a water-tight seal. Place pill box inside monster.

* Stuff monster with pollyfill
* Sew shut the second half of the head with the invisible stitch of your choice. The orange fabric is so fuzzy, though, that nothing much is going to show.
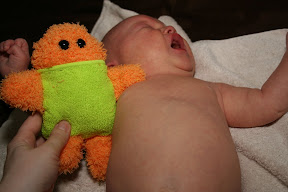
* Give to small child. Try to ignore the screams: he'll grown into it!


Optional Customizations:
* Cut a 1 inch length of the finished edge from the green cloth and attach to the center of the collar on back of the monster. Now you can attach a loop or clip for hanging from a toy bar
* Cut a similar length of finished edge from the orange cloth and sew in back for a tail
* Embroider a design on front of monster's "shirt"
* Add a mouth cut from felt, or embroidered

Friday, June 26, 2009

Baby Play Gym


Get all the fun of a $35 infant play-gym for about $5 in parts and a little time.

Materials: 
PVC Pipe, 1/2 inch diameter
PVC elbows, 2x
PVC T's, 2x
Pool noodle, 2x

Check out my instructions for this project in Instructable format

Monday, June 22, 2009

Make a Nursing Cover from Dollar-Store Materials

One of the easiest and most useful baby items you can make for yourself is a Nursing Cover (aka a Hooter Hider). There are dozens of tutorials for this project out there; the difference in mine is that all (or at least nearly all) of the materials may be obtained at a Dollar store, and the total cost should be $3 or less.

Materials:

* Receiving blanket from the dollar store (or an existing receiving blanket you aren't using for baby, or piece of nice flannel or cotton of the same size, purchased on sale at the fabric store. In the latter case, you'll need to serge or otherwise hem the other three edges.)
* Roughly 2 ft of ribbon, preferably grosgrain
* 12 to 14 inches of nylon boning from the craft store (see picture). It's $3.29/yard at my local store, meaning you need just over a dollar's worth. You could also use a pipe cleaner, as long as you sew your casing with open ends so it can be removed for cleaning. You could also use one or two extra long plastic zip ties fastened together for a double thickness.
* Extra Credit: 1 or 2 baby washcloths (which come 3-4 to the pack at Dollar Tree)

Tools:
* Scissors
* A few pins
* Sewing Machine
OR
* Needle and Thread

Instructions:
* Lay out your blanket, and locate the center of the long side by folding it in half. Mark with a pin.
* Take your piece of boning, pipe cleaner, zip tie, or whatever you are using for stiffening, and center it across the midpoint of the blanket on the wrong side. Fold the fabric over approx. 1/2 inch and pin in place at either end. Make sure the curve of the boning is facing "outwards" towards the right side.
* Cut 2 ~10 inch pieces of ribbon, and tie a solid knot about 1/2 inch from one end of each piece.

* Pin the un-knotted end of the ribbons to either end of the boning. You may want to fold the ends under once or twice to hide the raw edge.

* Sew by hand or machine from one ribbon to the other, making sure not to run into the boning since your needle will not appreciate it. If desired, sew all the way along the long edge of the blanket: I just did the 12 inches or so in the center.
* If you've used a washable "stiffener" (i.e. not a pipe cleaner), you may wish to sew shut the opening at both ends so it will not come out. Otherwise leave it open so you can remove the pipe cleaner for washing.

* Lay your two sections of ribbon out such that they cross near the ends with the knots overlapping. Take a ~2-3 inch piece of ribbon and tie it tightly around the two pieces. You now have an adjustable strap: just pull on the knotted ends of the ribbon to change the size.

* That's it! To use, simply slip the ribbons over your head and drape the whole blanket over the baby and the pieces of your anatomy you wish to conceal during nursing. When baby gets bigger, give him the blanket as a "superhero" cape. Just be sure you supervise to avoid choking!

* Extra Credit: Fold a washcloth into a triangle and sew into each bottom corner of your cover. Place right sides together and sew the two outer edges of the triangle, then turn right side out and sew across the hypotenuse. Now you Always have a burp rag to wipe baby's face after nursing! :)

Wednesday, June 17, 2009

Make a Cross-over Nursing T out of a Standard T


After my son was born, I quickly learned a couple of things. (1) I wasn't going to be wearing my "normal" clothes for a while yet, and (2) Nursing shirts are worth their weight in gold - which is unfortunate, since manufacturers seem to understand this and charge accordingly. Even at the resale shop I was paying $10+ for a workable garment. So, I started thinking about how I could make my own.
Here's what I came up with. There are no funny flaps or potentially embarrassing slits or anything, so this could easily work as a general purpose garment: just sew both layers together clear to the top as mentioned in step 4.

Materials:
* 1 XL T-shirt, or a T at least 1 and preferably 2 sizes larger than your ordinary size. I got mine for about $3 at the craft store.
* Embroidery or standard thread in matching or contrasting color
* Sew-on Snap (if making nursing T)

Tools:
* Scissors
* Needle

Skills:
* Basic hand sewing

Instructions:
A few disclaimers and tips first...
I "hacked" this. I didn't measure anything, or draw diagrams or even mark my cutting line. I'm willing to wear the finished product, but you could do better!
You're going to want to try on the shirt a few times during sewing so you can be sure it's fitting, and that it's modest!

1. Cut off the neck ribbing. I cut below the stitching line on the front, and above it on the back. (See photos below, especially in steps 6 and 7)

2. Following the diagram, cut up the front of the T. Adjust the width on the bottom left according to your size. It should be wider if you are smaller, and narrower if you are larger. You should try the shirt on before cutting and see how much excess width you have.


3. Fold the left side of the cut to the right side of the shirt and pin. Try on the T to make sure it fits, and adjust as necessary.


4. Using three strands of embroidery floss (or 2 of standard thread) and a simple running stitch, sew both layers of the T together up to point A (if making a nursing T) or point B (if making a general purpose T) If you are making a nursing shirt, make sure that point A is low enough to allow shirt to be pulled over to allow baby access.

UPDATE:
A running stitch works, but it wasn't very attractive and eventually frayed. A year later I redid this step with a zig-zag, which stretches better and looks nicer. There's a tutorial for a similar stitch here, but note I didn't complete the "x's" the way it shows: I just did the zig-zag.
Of course, you Could use a sewing machine here if you wished.


5. If making nursing T, install snap at point B. Try it on first and make sure it hangs properly. Mark snap location on both layers with a pin or disappearing fabric marker. You may need two snaps set a couple inches apart if you're a larger woman.


6. So far we've taken a lot of width out of the front of the shirt but none in the back. This will stop it from hanging properly off your shoulders: we need to modify the back to so that the seams will be near the top of your shoulders.
To do so, fold "darts" in the back of the T along the neckline to gather up excess fabric. The folds should meet in the center.
I found it easiest to do this while wearing the T so I could be sure it was fitting. I held the layers together temporarily with a clip.


7. Sew through all 3-4 layers of fabric with a whip stitch.


8. Now put it on, gather hungry baby, and take it for a test drive.

9. Whoops, he spit up on it. Throw it in the washing machine... and calculate how many of these you need before you can cut back to laundry every 3 days or less!


UPDATE: Admittedly what I've shown in steps 6 and 7 is not the most elegant solution, because you end up with a fairly thick "knot" at the back of your neck.
Instead of making a gather as shown, you could remove the excess width by cutting a strip out of the center of the back the T and then sewing it back together with a decorative zig-zag or X stitch.
Just be careful not to take too much out: Calculate a minimum of 1/2 an inch of seam allowance for instance. Also, the entire shirt will be narrower around the hips, unless instead of a strip you cut a "V."
I made a second shirt this way, but was not convinced the result was superior. Experiment with caution!